Tuesday, November 30, 2010

A quick digression

Our first batch of estate grapes. We have about 5 vines in the back yard and out of control vines along our fence-line on the North side of the property.
24 brix
did not record Acidity (dang).
Notice split grapes. Such a small batch was easy to pick through and discard the bad grapes.


Zinfandel on the vine. Zinfandel is red!
Jammy Raisiny flavors can come from grapes that are a little bit shriveled. A lot of shrivel means most or all of the juice is gone. You can see both kinds here.


Dry Creek Zin!
24 Brix
Acidity .6%
Yip!
We de-stemmed these 65lbs of grapes by hand (it took about 5-6 hours) and then...


Put the grapes in a strainer. Crush them (break the skins) with your fists or digits over a bucket and...


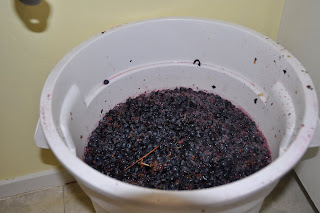
Put it all in a bucket and thus, must!

Our first 'estate batch' was fermented in an Igloo brand drink cooler (see photo of acid testing).


End digression.

Sunrise 11/30/2010


Waking up at 6:30 for work has its advantages.


Click photos to make them larger


Sunrise Oak Detail. Mmmm zoooom...

Sunday, November 21, 2010

Making Wine Part Four! Altering the course of grape juice!

Actually making wine!

Once the must is happily starting to stew in it's own juices, add metabisulphites (SO2,sulphites) and yeast.
The sulphite is added as cambden tablets in some ratio that I wrote down, calculated and forgot. I'll look it up and post it soon.

Measurements:
Brix (sugar content) can be measured by a weighted, metered floaty stick called a hydrometer.
Liquid with sugar dissolved in it has a higher density then liquid with sugar that has been converted to alcohol. Or, sugar, once converted to alcohol makes liquid less dense. Or, alcohol makes liquid less dense... The hydrometer sinks as alcohol is produced thus allowing you to calculate alcohol level.
On this batch my final of the season, The brix (sugar content) measured 25 when I first brought the grapes home. You divide the original brix reading of 25 by 2 and figure an alcohol content of around 12.5.


Now check the acid level. I am using the $8 acid test kit which strangely turns the grape juice pinkish red to start with as you add indicator solution. When the must turns gray, record the acid level. In this case .45 to low. So add Tartaric acid. 1 ounce ups the level by approx .15% per 5 gallons. Re-check. Final level .75 on this batch. You want a level between .6% and .75% for red grapes.


Yeast!
Everything that I have read has suggested emphatically that you add yeast 8 hours after adding sulfites to allow the sulfites to work and evaporate. I added mine within about an hour and so far, no ill effects.
Yeast eats sugar and produces alcohol while off gassing CO2. As a tour guide at the Rouge Brewery tour put it
"Yeast eats sugar, pees alcohol and farts CO2 and we adults love it! We'll drink that stuff all day."

It is actually true. The CO2 is captured in sparkling wine and beer etc... and it carbonates the beverage. In wine making, CO2, being heavier then O2, sits on top of the 'must' or wine and protects it from getting over oxygenated. When the CO2 production slows down, you remove the liquid from the skins and transfer it to a more controlled environment. In my case a 3 gallon carboy!

When the floaty hydrometer sinks to the point where it reads '1' instead of its original reading (in this case '25') it is time to transfer the wine.

I am using 3 gallon plastic carboys as opposed to the usual 5 gallon for fear of completely blowing it and making vinegar. In hind site I would just go ahead and make a 5 gallon batches because the amount of labor would be similar but the amount of wine would be greater.

As you can see here, my sophisticated method of wine making includes a nylon mesh bag a funnel a ladle and a carboy. I apologize for the lack of detail photos but my hands were sticky and slowly getting dyed deeper and deeper shades of purple during this process.

Ladle grapes into mesh bag,that is placed on a funnel, that leads to the carboy.
Twist
Mash
Smush
Squeeze
Empty smushed grapes into your compost pile
Repeat.

Add sulfites

Next:
Top carboy with a bubbler. The bubbler or air lock is a one way valve that allows CO2 out and does not allow O2 in.
Now relax! You just started the last stage of a process that will turn a great kids drink in to a hopefully sophisticated adult beverage that will compliment a steak or something!

Next step racking!

Wine Making Part Three! Supplies!


This is all I that I used for my batches of wine (as far as the "technical stuff").

1) Hydrometer: ($18) Measures the sugar level 'Brix' when the wine is 'must' and then before crush to tell you the alcohol level
2) Acid test kit: ($9) Tests acid level. (Duh.)
3) Sanitizer: ($4) There are many sanitizers but this one is special because it is mine. Sanitize anything that is in contact with the wine or must.

4) Yeast: ($1.95) Many types of yeast out there. 'Prise de Mousse' was the one suggested by 'The Beverage People' where I got my supplies. So far so good!

5) Yeast Nutrient/Yeast food: ($1.95/$3.95) Adds nitrogen to the must which helps to clear the wine, and ages it a little faster.

6) Tartaric Acid: ($2.95) Adds acidity to under (um) acidic wine.
7) Campden tablets: ($.95) Sulfites! Helps to kill mold and beasties in the must and wine. People don't tend to like this stuff. Some people are allergic to it. I don't know enough to argue it either way. I added about 5 parts per million which is not that much. If I feel like the wine needs more I'll add it. I'll go light on it.
8) Irish Moss: ($.99) Smells like rotten seaweed but is used in beer and wine making to clarify the finished product. Apparently it does not impart any smells or taste.
9) Food Grade Bucket: ($30-$85 or so) (Pictured in previous post) Other buckets may work but they may impart flavors or chemicals. I used a 20 gallon which works well for 60-70 lbs of grapes.
10) Siphon Hose: ($6)
11) Carboy: ($26-$35ish)Varies in price depending on materials that it is made out of usually either glass or plastic, and size, usually 3 to 5 gallons.
12) Mesh bag ($5) I used this to crush the grapes and strain out the seeds and skins.
13) Funnel ($6ish) used during the crush to get the wine from the mesh bag in to the carboy.
14) Air lock ($3.50) get a few of these and corks with holes in them that will fit in every size jug or carboy that you may use to ferment wine in.
15) Gallon jugs. ($4.50) Have a few of these around just in case you have extra wine during your crush.

That is about it. In total $120 ish and you have enough to get going. Most of the gear can be re-used and additives like the tartaric acid, Campden tablets, tartaric acid and even yeast, have enough material to be used in future batches. So once you splurge on the up front costs of gear your future batches will only require, paying for grapes, upgrading material and the minimal costs of additives. Not to shabby.

Next post Using the stuff!

Wine Making part two! Grapes to must!

Fill the bucket! Apparently about 30 lbs a piece.


Carry it all the way up to the home where awaits...


A crusher de-stemmer! This device will swat the grapes off of the stems and spit the stems out of the side of the machine while the crushed grapes slide, or stick until they are pushed out of the little slough at the bottom of the machine. It takes about 2 minutes for 60lbs of grapes.

Our first batch of zin which was about 70 lbs took about 6 hours of combined work between my wife and I to de-stem and crush. It was a good exercise and really, the overly raisened grapes were easy to pick out and discard so it was probably a good thing we did it the old fashioned way but yeesh! It took forever. Books on tape were good here.

Also, not every grower will make a de-stemmer available to you. Especially for small batches it may not be worth the $30 you are paying for their grapes for them to clean there machine. You may be able to schedule a time when the grower knows that the machine will be in use for another larger buyer or, they may charge you an extra fee or you can commit and do it by hand. You could also rent one.

Next, Take the food grade bucket of smushed grapes home and sit it in a corner of the room and put the lid on tightly!
Fruit flys love grape juice! Those little buggers hone in on this stuff like pigeons to bread crumbs, then seemingly reproduce like caffeinated bunnies. All of a sudden you have a kitchen that is difficult to drink wine in much less make it.


Yeah, next time I'll take a little more time to clean up all sorts of little juice spots and I may just put the bucket on the porch or in the barn depending on the outside temp.
(Next! The gear you need to make this bucket of grape juice in to tasty wine!

Tuesday, November 9, 2010

Wine Making for Beginners!

I would like to clarify that this is my third batch of wine. All of my batches have been made this year.
The first batch was from grapes picked from the vines on our farm and we got an entire gallon out of it.
The second was about 65 lbs of Zinfandel that I picked in the Dry Creek Valley area about a month and half ago we have 3 gallons from that batch.
This is my third batch and so take my step by step as you will. I am not an expert but a beginning hobbyist.

Background info on the harvest:
Harvest to the best of my knowledge occurs when the sugar content (measured in Brix) hits round about 22-24 for red grapes (more below). This requires a season of maturation on the vine and was also just beginning to happen right when we moved to Windsor! Thus, the new hobby!

This years harvest was an odd/challenging one. The cool overcast summer led to a slower maturation of the grapes. Then, once growers had lifted the canopy (leaves) to expose their fruit to occasional glimpses of sun, the clouds cleared and BAM! Days of harsh sun and 100+degree weather baked a percentage of poor little exposed grapes to raisens! And then! Rain!

Grapes are kind of like tomatoes. Withhold water and make them suffer a bit and you get smaller more concentrated fruit (is a tomato a fruit?). If you 'torture' your vines for a season and then all of a sudden they get an abundance of water, their is the risk of grapes swelling and splitting. Also mold can grow on the grapes themselves (see photo below).

We had two solid days of rain before most grapes matured and then a week or so of pretty cool, humid weather. Good conditions for mold.

When you are dealing with a balancing act of yeasts and sugars, any extra beasties in the 'must'
(early stage of wine) such as mold can cause at the least anxiety, and at the most really undrinkable wine.

So, a little more back story then I had planned but I hope it was informative. From here on out, the steps will be basic because that is the extent of my knowledge. The best way to get info would be to buy a book or take a class on wine making. Or, order a catalog from The Beverage People or Wine Wine and More Wine or just go here and read Iowa State's take on it.

First step!
1. Marry a fantastic women who turns out to be your best friend and move to wine country at the beginning of harvest time!!!
This step is optional but I recommend it.

2nd step!
Find the grapes!
Decide what type of wine you would like to make and go to Craigslist or Google wine resources for your area.
You need to find out if the grower is willing to sell to a home wine maker. We tend to take the best grapes and when purchasing grapes anywhere from 50 to 75 cents a pound like we did this year we understandably aren't worth a production growers time.


3rd step:
Go to the winery, be amazed at the beauty, colors and sounds that surround you.
Even if wine is not your thing, the countryside, architecture, flora and fauna that are associated with wineries are pretty special. The people that I have been in contact with who are owners or in charge of the wineries have been pretty special as well.
The vintner should give the scoop on where to pick, the brix, and the condition of the grapes.
In this case, we are pretty close to late harvesting so the condition of the grapes is understandably a bit questionable and this was clearly stated by the owner/grower (more below).


My lovely bride headed to the vines!


Checking out the grapes for the first time. In some sections the grape clusters were fine. In others...


Mold! Move on and...


Inspect and reject anything fuzzy! Normally cutting 60lbs or so of grapes should take about 1/2 hour. It took us about twice that with having to be so selective.


More next post!

Thursday, November 4, 2010

Chicken picture!


The only chicken not shown in the rooster post below is Lucy. She is a Rhode Island Red and will lay light brown eggs.

If you would like to see the first 2 chicken reports send me an email. I can't figure out how to post PDF's to the web. The chickens (chicks) are pretty cute in the previous reports though and if you haven't seen them, it may be worth a look.

Veggie Patch update!

Again the sunny side of the yard is rocking! If plants that are growing can rock. Really big sprouts and needs to be thinned.


It's a good thing we viciously uprooted Howard's (the lawyer chef's, not the androgynous chicken's) lettuce! It would have been shaded by the broccoli behind it. Pretty soon we'll be choppin' bro coli!


Shaded planter box.

A little humbling but good things come to those who experiment.


Rooster Bingo!

We have a potential Rooster Glut! What does this mean?
Roosters are great because they can protect your flock, herd them around the yard and give you cute little chicks! They unfortunately crow at all hours day and night, pick fights with other roosters and apparently make unwanted advances on cute little hens when it is least expected or when in front of mixed company!
So, at some point either these birds will lay or they will crow. They layers stay and unfortunately, the crowers go! We may keep one around to see what it is like but most likely we will just keep the females.

Sooooo, we are not quite sure which chickens are roosters in our flock.
Here are the main contenders. Place your bets and hit comment to share your opinions!
(Click on any photo to make it bigger)

Samwise (Cochin):

Named after a fat little docile Hobbit (because of his hairy feet), Sam has a decent comb and waddles and definitely likes to scrap with our next contender Howard. Sam is really sweet and will come to you when you squat down to say "Hello". He is also very brave. He (she) will run up to Bella and check her out while she is lying near by.


Howard (Americaun)!

Howard is our most famous bird. Not only because he was named after a good friend of ours, but he is by far our biggest chicken! His sister Racer 5 is much smaller. His comb is pretty small and his waddles are almost non existent. Their are some saddle feathers but his hackles are pretty rounded (not pointy like a roosters should be). He's pretty scrappy and will keep other chickens in the flock in check by charging at them while they graze in the yard.


This is Itchy(Plymouth Barred Rock):
This is our most blatant rooster. Not that he is bigger or the least bit scrappy, but his sister has a small yellow comb and tiny waddles. Guilty by comparison!


Here is a photo of 5 of our seven birds rolling around and relaxing in the grass. They all get along and they all have great personalities. We'll be sad to see some of them go, but we have a strong desire to continue getting great nights sleep out on the farm and to have a great laying flock!

Sunrise 11/3/2010


Windsor in the a.m.